New for Cab Grid Pro version 5.5 the main Cab Grid interface will acquire dynamic CSS classes based on user input… This means subsequent content can be manipulated according to parameters selected in the main calculator interface such as origin location, destination, number of passengers, tickets, or time.
Common use-cases for this would be to show flight detail form fields only if an airport location is selected or handling journeys to unlisted destinations. We will explore how this may be achieved below, though there are many other possible use-cases too.
CSS Class Syntax
 At the point a fare price is generated a set of CSS classes are added the main Cab Grid Pro HTML element reflecting the values selected. These classes all follow this format:
cabGridCalcProp-[value]
Where [value] is the value of the specific parameter. So a complete example might look like this:
<div class="cabGridPro ... cabGridCalcProp-origin6 cabGridCalcProp-dest6 cabGridCalcProp-vehicle cabGridCalcProp-pass2" id="cabGridPro1">....</div>
The best way to determine classes added for specific conditions is to select the desired parameters in the Cab Grid interface on your site, and then inspect the code using the web browser inspector. This is usually available by right-clicking the Cab Grid calculator element and choosing ‘Inspect Element‘ (or browser/system equivalent).
The possible class names are as follows.
| Prefix | Value | Example | Description |
|---|---|---|---|
| cabGridCalcProp-origin | ID (Number) | cabGridCalcProp-origin2 | The ID of the selected pickup location |
| cabGridCalcProp-originGroup- | Parent group name (Text – spaces as underscores) | cabGridCalcProp-originGroup-Airports | If groups enabled, the parent group name (in native site lang) of selected origin. |
| cabGridCalcProp-dest | ID (Number) | cabGridCalcProp-dest6 | The ID of the selected destination |
| cabGridCalcProp-destGroup- | Parent group name (Text – spaces as underscores) | cabGridCalcProp-destGroup-Town_Centre | If groups enabled, the group name (in native site lang) of selected destination. |
| cabGridCalcProp-vehicle | ID (Number) | cabGridCalcProp-vehicle3 | The ID of the vehicle (either selected by customer or allocated by system) |
| cabGridCalcProp-pass | Quantity (Number) | cabGridCalcProp-pass3 | The number of passengers selected by the customer (if available) |
| cabGridCalcProp-lugg | Quantity (Number) | cabGridCalcProp-lugg4 | The quantity of luggage items entered by the customer (if available) |
| cabGridCalcProp-tickets | Quantity (Number) | cabGridCalcProp-tickets5 | The quantity of tickets entered by customer (if available) |
| cabGridCalcProp-time | Quantity (Number) | cabGridCalcProp-time8 | The quantity of time units (e.g. hours) entered by customer (if available) |
| cabGridCalcProp-price | Price Variant (Text) | cabGridCalcProp-priceVariant1 | The selected price variation (Standard/Variant1/Variant2) |
Example: Show flight form fields when airport selected
In this example, consider a taxi company offering airport transfers along side other local services. When a customer selects an airport as either the destination or pick-up location we want to gather flight information. However, if the booking is for a local journey, the flight fields should not be visible.
Step 1: Add custom flight form field(s)
Add custom form fields to the taxi booking form as detailed here: Add Custom Booking Form Fields.
For the purposes of this example, let’s consider this custom form field syntax: Flight No.:TF:N::BA123
Step 2: Determine the classes for the airport location(s)
- Visit the page on the web site where Cab Grid Pro is displayed.
- Select the airport location(s) as either origin or destination.
- Generate a price
- Use the browser’s web inspector (as detailed above) to determine the class name(s) for the airport locations.
Let’s assume you have determined the class names for the airport locations as cabGridCalcProp-origin2 and cabGridCalcProp-dest2
Step 3: Determine the classes for the flight information form fields
- Visit the page on the web site where Cab Grid Pro is displayed.
- Select the airport location(s) as either origin or destination.
- Generate a price
- Click the book button to display the booking form
- Use the web browser’s inspector to inspect the flight information custom form fields
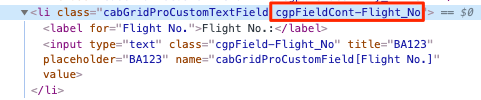
Each custom form field is enclosed in an HTML list element <li> and assigned a class based on the custom form field label (assigned when adding custom form fields).
For example: <li class="cabGridProCustomTextField cgpFieldCont-Flight_No">...</li>
So, considering our example custom form field (above) the class name we are looking for would be: cgpFieldCont-Flight_No
Step 4: Add CSS
Custom CSS is entered under the OPTIONS tab on the Cab Grid Pro admin page. See Basic style changes using CSS for details.
Here is the CSS required to implement our goal of only showing the flight info field when an airport is selected:
/*Hide this input by default*/

.cabGridPro form ul.cabGridProBookDetails>li.cgpFieldCont-Flight_No {display: none;}

/*Show field if origin is 2 (airport)*/

.cabGridPro.cabGridCalcProp-origin2 form ul.cabGridProBookDetails>li.cgpFieldCont-Flight_No {display: block;}

/*Show field if destination is 2 (airport)*/

.cabGridPro.cabGridCalcProp-dest2 form ul.cabGridProBookDetails>li.cgpFieldCont-Flight_No {display: block;}
Note where the dynamic parameter classes (.cabGridCalcProp-origin2 & .cabGridCalcProp-dest2) are added, and the custom form field class (.cgpFieldCont-Flight_No).
Conclusion
As classes are dynamically added the main Cab Grid Pro element based on customer input there are many possibilities to manipulate the booking form and better guide visitors through the booking process.
Here is another example using dynamic classes to offer a quote request when a customer’s preferred place is not listed in the pick up or destination drop-downs… or, because Extras each have an identifying class assigned, certain Extras could be shown or hidden based on destination.

Hello I have been trying to configure this css the first part to hide these cells works, but when the airport whose ID is “1002” is selected nothing happens, could you help me with this:
/ * Hide this input by default * /
.cabGridPro form ul.cabGridProBookDetails> li.cgpFieldCont -Flight_Number {display: none;}
/ * Show field if origin is 2 (airport) * /
.cabGridPro.cabGridCalcProp-origin1002 form ul.cabGridProBookDetails> .cgpFieldCont -Flight_Number {display: block;}
/ * Show field if destination is 2 (airport) * /
.cabGridPro.cabGridCalcProp-dest1002 form ul.cabGridProBookDetails> .cgpFieldCont -Flight_Number {display: block;}
then I copy and paste the css / html code that the chrome inspector throws at me, where the airport from which I want to obtain the id is selected in the destination box to make the boxes appear previously olcutes with this css.
class = “cabGridPro cgp-noTouch cgp-passengers cgp-5_8_19 cgp-dark cgpLog0 cgpMobileN cgpTabletN en_ES cgpUser-loggedIn cabGridProToolTips cabGridProWide cabGridProSplit cabGridCalcProp4 passCalcrop1 cabGridGropPropCal1002 cabPridGropPropCal1002 cabGridGropPropCal1002 cabGridGropProp4 originCrop1 cabBPGrop1
i need you help
Hi Juan,
The classes applied to your CabGrid Pro element seem unusual or malformed (… cabGridCalcProp4 passCalcrop1 cabGridGropPropCal1002 cabPridGropPropCal1002 cabGridGropPropCal1002 cabGridGropProp4 originCrop1 cabBPGrop1 … )
Please update to the latest version of CabGrid Pro for your WordPress Admin Plugins page.
Failing that, please contact us via our support page – https://cabgrid.com/support
Hi CabGrid team,
What if I want to add multiple airports?
If you add all of your airports to a group called, say, “Airports” you can target that group via CSS. For example:
.cabGridPro li.cabGridProCustomTextField.cgpFieldCont-InBound_Flight_No { display: none;}
.cabGridPro.cabGridCalcProp-originGroup-Airports li.cabGridProCustomTextField.cgpFieldCont-InBound_Flight_No { display: block;}