Cab Grid Requirements – How to setup WordPress
"I don't have a web site" or, "My web site is not currently built with WordPress"....
Cab Grid runs on WordPress. WordPress is a FREE open-source content management system (CMS). It provides an easy way to build and add content to a web site. Almost everything is done through a web browser.
Cab Grid is a plugin for WordPress. It enhances WordPress's core functionality by adding an interface for managing journey pricing, and then adds a widget (calculator interface) to a page or pages of a website where customers can interact with it.

Not sure? Find out if your web site is built on WordPress...
Requirements
WordPress Web Hosting
WordPress requires web hosting that supports PHP 7 (or higher) and a database (usually mySQL or MariaDB).
We recommend Digital Ocean for WordPress hosting and, if you follow our referral link, you'll get a $100 credit when you sign up. You can also use SpinUpWP to set up your server automatically.
A Domain Name - e.g. yourcompany.com
Register a domain name through a registrar like 1&1 or Name.com.
Cab Grid requires some additional functionality (such as PHP Mail and cURL). However, this is usually included - especially with dedicated WordPress hosting - but check with your hosting company for configuration information.
Installation complete?
If you meet these requirements and you have WordPress setup (see below), now install Cab Grid...
WordPress Set up (installation)
Dedicated WordPress hosting providers often provide a "one-click" set up that installs files and configures the database. However, it is also possible to install and configure WordPress manually on any host that supports it.
SpinUpWP is a service that sets up your server and installs WordPress for you. It works especially well with a Digital Ocean droplet and, if you follow our link, you'll get $50 in credit from SpinUpWP too.
Manual Set Up
If the host provides a one-click or managed set up, WordPress may already be installed. In this case, skip to step 6 below.
See WordPress's own "Famous 5-Minute Installation" guide, but here are the essentials...
- Set up database and note
- Database host IP (if not localhost)
- Database name
- Database user
- Database password
- Download WordPress from WordPress.org and unzip it to a folder on local computer
- Rename the wp-config-sample.php file to wp-config.php
- Edit wp-config.php to add database credentials (and Salt)
- Upload the WordPress folder to the web server.
(In most cases upload at root level unless there is a specific reason to host in a sub-directory.) - Visit the site using a web browser. You will be prompted to set up an initial account and log in.

Step 6 - WordPress Install Screen
One-click or Managed WordPress Setup
In this scenario, the above steps (database setup, file installation, WordPress config) are taken care of either automatically or by the hosting company.
Visit the site to set up the administrator account and log in.
Build the basic site
WordPress is a templated system, meaning templates can be installed that change the appearance of the site. WordPress refers to templates as Themes. There are many, many themes available either free of charge or paid for.
WordPress comes with several themes pre-installed. Setting up additional themes is beyond the scope of this document, so we will continue assuming the default theme is in place or a theme has been chosen.
WordPress offers several content types: Posts, Media, & Pages. Each is handled slightly differently, and other content types can be added to augment functionality too. For a taxi or travel or delivery based site - which is what Cab Grid is designed for - Pages will be the primary content type. These are what WordPress uses to form the static informational parts of the site.
It is possible to deliver all information via a single page, but many businesses divide this up across several pages such as Home, About, Pricing, Contact, Terms, etc.
Get the Divi Theme
Our site uses the Divi WordPress theme from Elegant theme. It is an advanced visual builder that makes it easy to grad, drop and style elements, and, of course, it works perfectly with CabGrid.
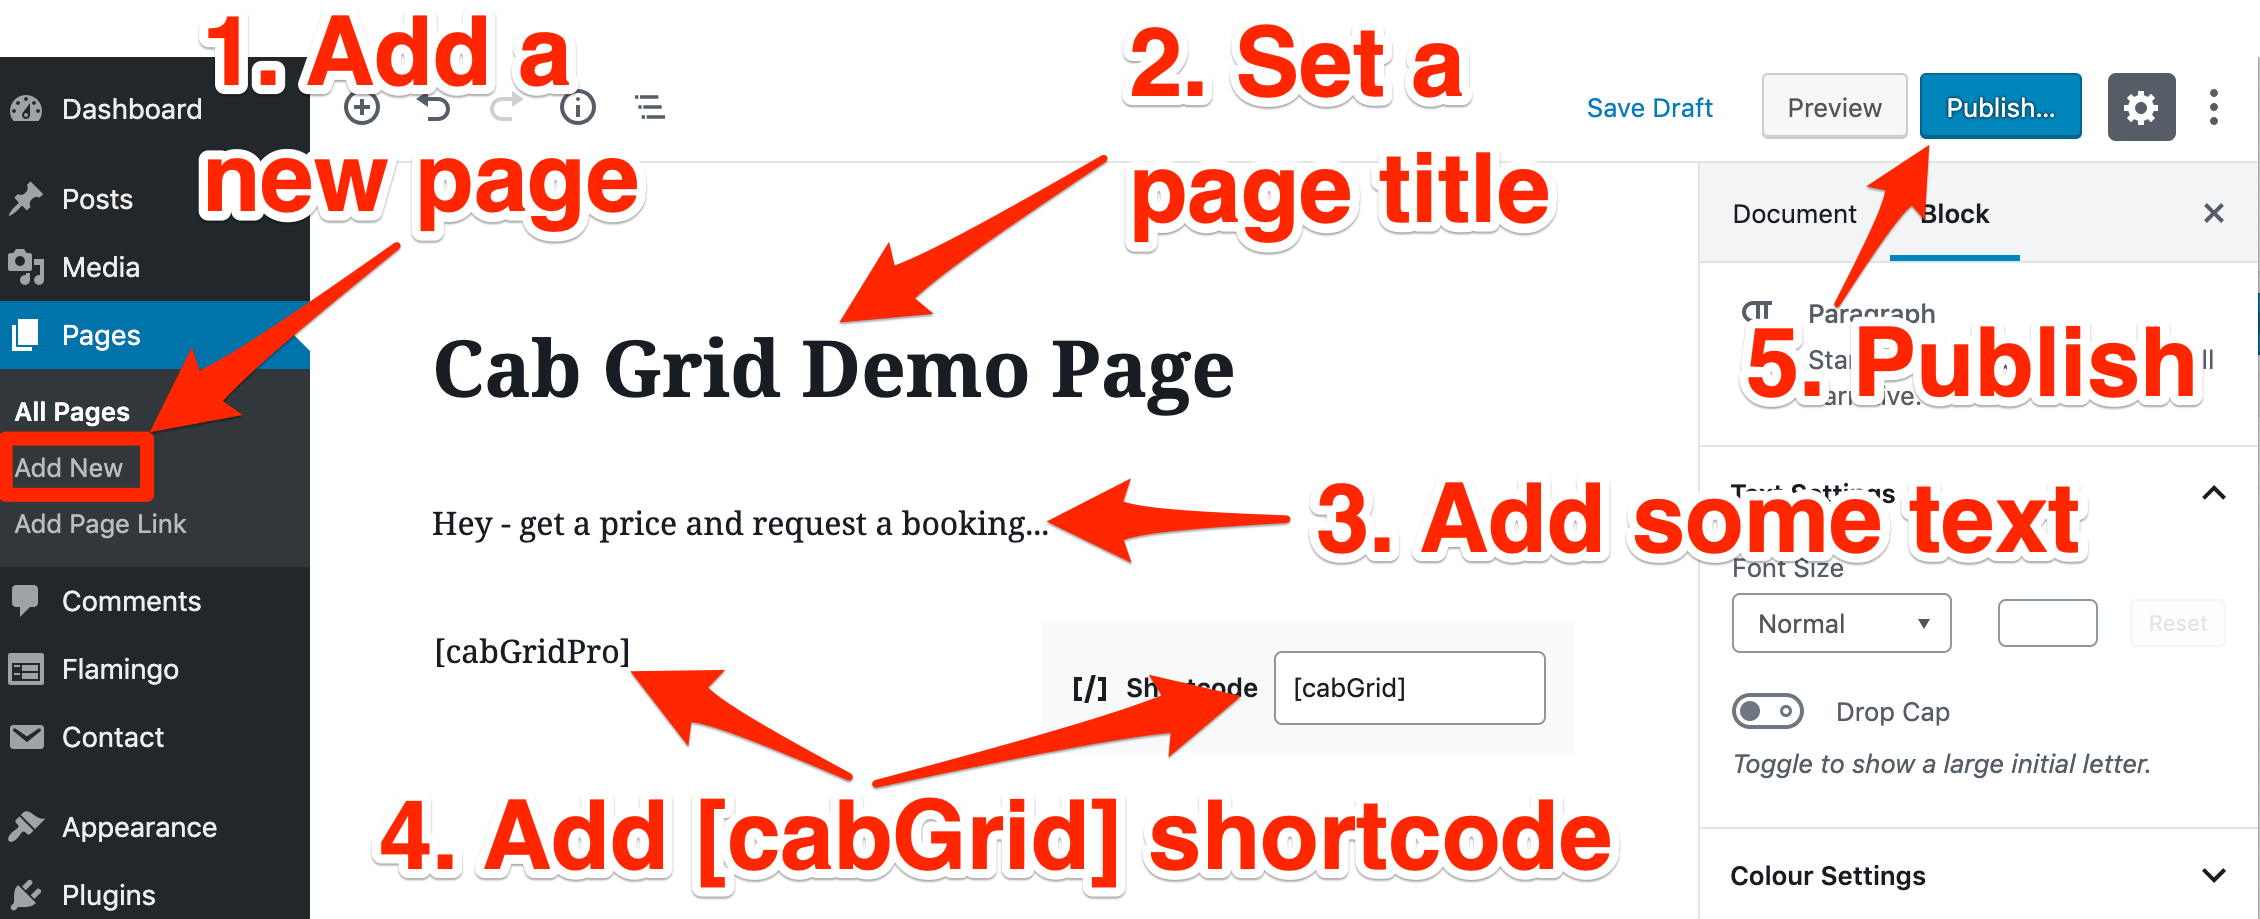
Add a Home Page
- From the admin menu on the left side go to Pages > Add New
- Type a title, e.g. 'Home' or 'Welcome'
- Add some intro text
- Add the
orNo price available for this journey
Please call to book...(You can customise this message)
shortocde* where you want the Cab Grid price calculator interface to appear - Click the PUBLISH button
*If this is a fresh installation, Cab Grid may not yet be installed or configured.
Make it the home page
- From the admin menu on the left side go to Settings > Reading
- Under 'Your Homepage Settings' select 'A Static Page'
- From the 'Homepage' drop down menu select the page to be the home page.
- Click the SAVE CHANGES button at bottom

WordPress setup complete
At the top of the WordPress Admin, next to the WordPress icon, you will see your Site Title. Move the mouse over the site title to reveal the VISIT SITE link. Click this to view your site and check your home page.
Now WordPress is installed and configured, you can begin to install and configure the Cab Grid or Cab Grid Pro plugins.
You may also want to add additional pages and content. There are plenty of online tutorials which provide more help.
